Exhibitor Help – Pheedloop
Help and instructions for questions pertaining to the Pheedloop platform
GPX is now using Pheedloop for the registration platform, which includes an exhibitor portal housing all exhibitor information and more, a robust Mobile application, and Lead Retrieval, now in 2 different packages.
Please White Label @pheedloop.com to make sure you receive all communications from platform!
Quick Links
- Exhibitor Portal Login – CHARLOTTE
- If you don’t know password – simply enter email and say “forgot password”
- Must be added as Primary Contact or Manager to exhibitor profile to login
- GRAPHICS PRO EXPO App – CHARLOTTE
- If you don’t know password – simply enter email and say “forgot password”
- Must be added as Primary Contact or Manager to view Lead Retrieval (exhibitor tools) menu
- Member Portal Login
- to update personal profile, review purchases, and registrations
-
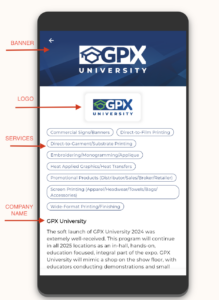
Exhibitor Portal - Exhibitor Profile
Each section of Exhibitor Portal related to Profile
What profile can look like in Mobile App:
-
Company Profile - Adding Company Basic Information
*From Exhibitor Portal navigate to Company Profile (CA Link)
Fields: (For exhibiting company – not personal profile)
-
- Tagline – viewable in profile
- Description *(required) – enter description of what company is
- Email – main email you wish customers/attendees to contact company on
- Address – update if needed
- Phone Number – update if needed
- Social medias – enter all company social media handles/links
- Services *(required) – add all products/services that your company provides – to be used for Matchmaking on App
-
-
Company Logo & Design - Adding Company Logo, Banner, Video for App
*From Exhibitor Portal navigate to Company Logo & Design (CA Link)
Fields:
-
- Logo *(required) – Upload company logo
- Banner – shown at the top of your profile pages
- *Required if purchased Mobile App Banner Sponsorship
- Thumbnail *(required) – A square representation of your logo. Displayed in lists and icon sets.
- Video – Upload a promotional video.
-
-
Files - Adding Files for Exhibitor Profile
*From Exhibitor Portal navigate to Files
- Upload any files you wish to be displayed/linked in Exhibitor Profile
- Select Private if it is for internal use only (don’t want it displayed)
- Upload any files you wish to be displayed/linked in Exhibitor Profile
-
-
Exhibitor Portal - Managers & Badges
Adding Managers and registering for Badges
-
Managers - Adding & Access
*From Exhibitor Portal navigate to Managers
- Add anyone that will need access to Portal or will be scanning leads
- May add or remove as many as you please
- If access to portal is needed:
- Send them Exhibitor Portal Login link
- They will enter email you added them under
- press “Forgot Password”
- Will receive email to login with password
- Send them Exhibitor Portal Login link
- If access to App is needed for scanning leads
- Have them download GRAPHICS PRO EXPO mobile app from App Store/Google Sore
- Enter email and press “Forgot Password” to login
- Have them download GRAPHICS PRO EXPO mobile app from App Store/Google Sore
- Add anyone that will need access to Portal or will be scanning leads
-
Exhibitor Badge Registration
*From Exhibitor Portal navigate to Exhibitor Badge Registration
Key points:
- For Exhibitors ONLY!
- Each person must be registered to receive exhibitor badge onsite
- Managers will also need to register for badges if they will be onsite
- Must use unique email for each person (match emails of managers)
- Enter Exhibiting Company Name for “Company” field in each registration
- View and update registrations made in Member Portal
-
-
Exhibitor Portal - Marketing, Announcements, Tasks, Floor Plan, etc.
-
Marketing - Special Invite
*Custom Promo Code can be found on Exhibitor Portal – Information Page
*From Exhibitor Portal navigate to Marketing Tools – Special Invite
Find more information and Custom Invite Template (PDF) Download- Special Invite Template: includes space for you to add company logo and custom promo code
- Promo Code – gives $10 off Regular Price Registration ($19.95) only
-
Announcements
*From Exhibitor Portal navigate to Announcements
- Find all announcements directly from GRAPHICS PRO EXPO!
-
Task Assignments
*From Exhibitor Portal navigate to Task Assignments
- Find all Tasks that have been assigned to company
- Some tasks must be marked complete once finished – these should be completed by due date if listed and are important to complete!
-
Floor Plans
*From Exhibitor Portal navigate to Floor Plans
- Exhibit Hall Floor Plan
- Will be static (not able to click on) until closer to event
- Booth Number can be found at top of page, as well as on information page
- Exhibit Hall Floor Plan
-
Discount Deadlines
*From Exhibitor Portal navigate to Discount Deadline
Find important deadlines for Convention Center, AGS, Shipping, Hotels and more.
-
Service Manual
*From Exhibitor Portal navigate to Service Manual
In Service Manual find:
- All forms to submit to AGS, Convention Center, etc.
- Shipping, move in, move out, and show schedules
- Guidelines for booth displays, hanging signs, and more!
-
-
Lead Retrieval - Purchase
Pheedloop now offers one Lead Retrieval ($200)
*Exhibitors only need to purchase once for entire staff of exhibiting company to use!
-
Lead Retrieval overview
Lead Retrieval ($200)
This feature allows you and your staff to scan attendee badges with your smartphones on-site, collect contact information (name and email at minimum) and notes, capturing leads in real-time. Key contact information for your leads will be made instantly available to you right here, in your exhibitor portal.
*No limit on staff/scanners! You may have as many users/staff scanning badges as you would like, at no additional cost. Simply add them as Managers in exhibitor portal.Other features:
- Capture business cards of attendees or others at your venue for later use
- Create a custom form for scanners to fill for scanned attendees and download the results directly from your Exhibitor Portal.
- Set up meeting booking and allow attendees to schedule meetings with your exhibit staff
-
Purchasing Lead Retrieval
*From Exhibitor Portal navigate to Lead Retrieval
- Click on Purchase Link near bottom
- Add Lead Retrieval
- Only one must be purchased per exhibiting company.
- Once purchased, your lead retreival will be added to your exhibitor profile within 24 hours
- Next Steps:
- Add one in Lead Retrieval you wish to purchase, and press Continue
- Check that you selected the level you wish to purchase and have information filled out correctly and press Proceed to Checkout
- Press Checkout Now; Fill out payment information and press Pay Now – Finished!
- Add Lead Retrieval
- Click on Purchase Link near bottom
-
-
Using Lead Retrieval
See how Lead Retrieval works onsite
*To scan leads you must download the GRAPHICS PRO EXPO Mobile App
- To see exhibitor/lead in menu, one must be added as a Manager or Primary contact under exhibiting company profile.
- Add Managers at any time in Exhibitor Portal
- Once you are logged into GPX App and have loaded your event, look for Lead Retrieval under Exhibitor Tools in the pull-out menu
- Ensure you have given the event app permission to access your device’s camera (if you denied permission earlier, enable it via your device’s app settings)
-
IMPORTANT ONSITE UPDATE - Scanning with No Service
When scanning onsite – please note below steps in order to guarantee your leads are saved and never lost!
For Offline Scanning:
- Use Lead Retrieval tool as normal, but will see WiFi icon with a cross through it on the Lead Capture page. This indicates that you are scanning offline.
- Once offline scans are captured, you will see a yellow “Attendee will be scanned when you’re back online” message
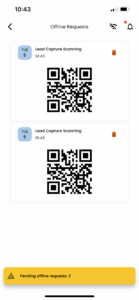
- Attendees scanned offline will be saved under the Offline Requests page, which is accessible via the circular arrow icon.
- Once connected back to WiFi, scans will be synced to their profile. You will no longer see the circular arrow icon.
IMPORTANT NOTES
- Make sure you upload your scan via WiFi each day before exiting the convention center! There is Free Wifi available in the lobby.
- GPX Long Beach – Free Wifi is in lobby and classrooms (Not in exhibit hall). Use Wifi name: LongBeachWiFi (no login required)
- DO NOT log out of app if you have any pending scans, this will remove them.
- Closing the app does not delete offline scans,
- Offline scans are not synced with cellular data. WiFi is required as it is more reliable.
- It’s recommend that your leads are synced on a daily basis, as inactivity for 72 hours will cause the user to logout automatically, losing leads.
-
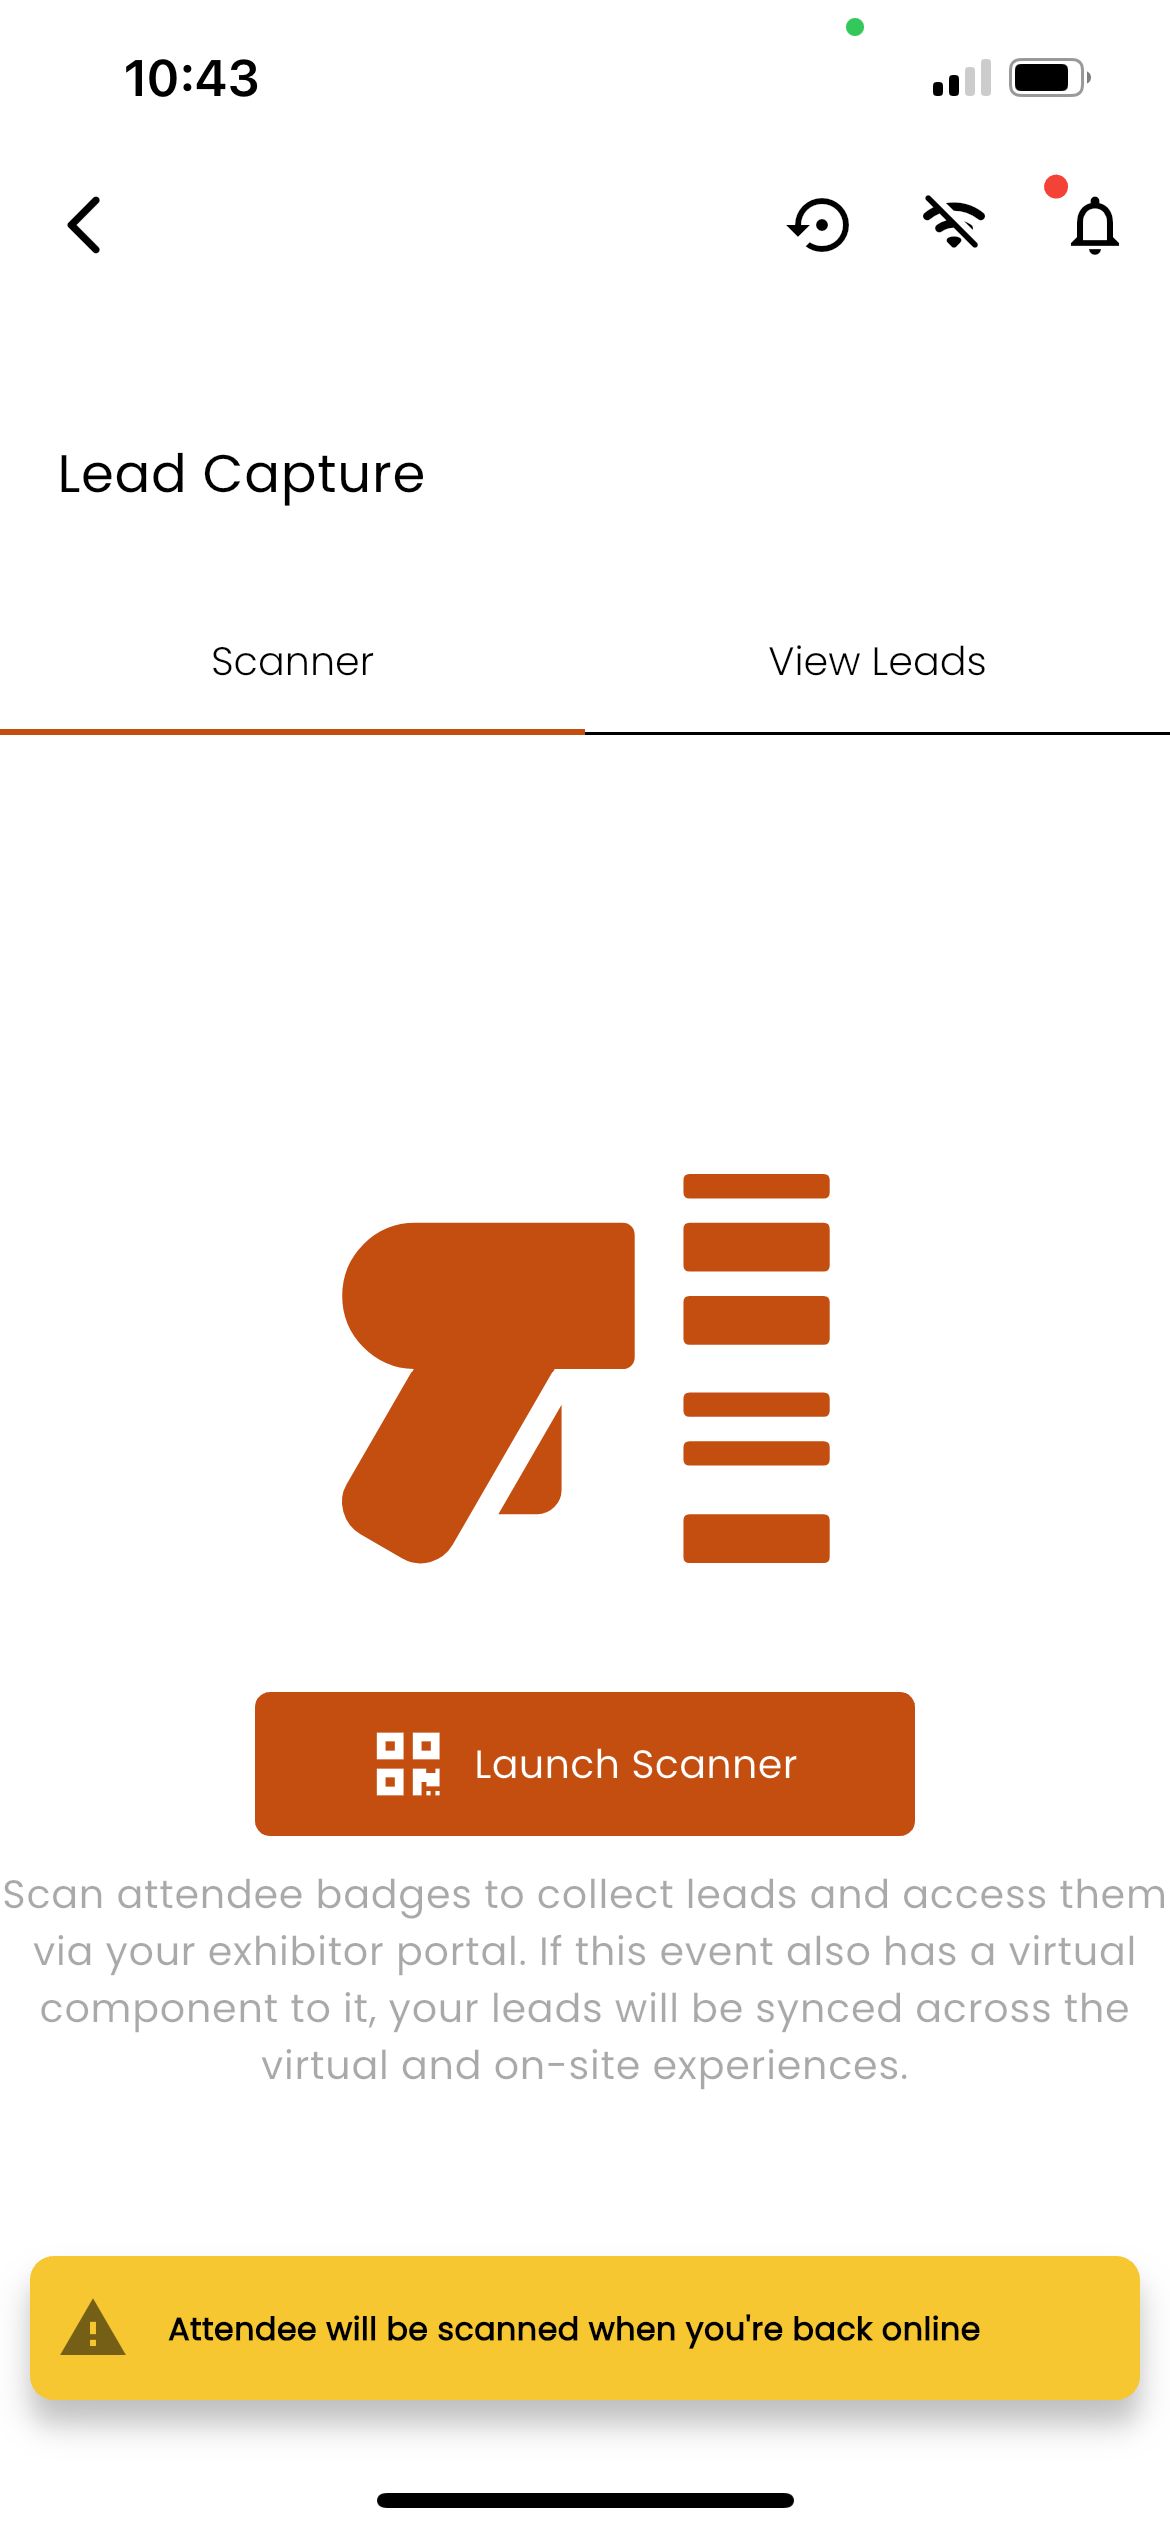
Accessing the Lead Capture Tool

-
- From the GPX Mobile Event App, navigate to left hand side navigation menu
- Under Exhibitor Tools, select Lead Capture
- Select Launch Scanner
- Scan the QR code
- Under Notes, fill out any information the lead has provided
- Under Authority Rating, rate the lead between 0-10 in terms of authority for their organization
- Under Budget Rating, rate the lead between 0-10 in terms of what their budget could be for your service
- Under Needs Rating, rate the lead between 0-10 in terms of how urgent their needs are from your organization
- Under Overall Rating, rate the lead between 0-10 in terms of how qualified the lead is overall for your organization
- Select Save
*Offline scanning is available for exhibitor lead capture. Once your device reconnects to wifi, the leads that were captured will sync in real time.
-
-
Re-visiting Your Leads from the Event App

-
- From the Mobile Event App, navigate to left hand side navigation menu
- Under Exhibitor Tools, select Lead Capture
- Select View Leads
- Select the lead you would like to view/edit from the list
- Edit any information similar to when you scanned them originally
- Select Save
-
-
Downloading Lead Retrieval from the Exhibitor Portal
Anyone who is a manager associated with the Exhibitor Profile will be able to access the Exhibitor Portal. Simply navigate to the Lead Retrieval page to access all of the attendees your team has captured. All information for leads including personal information such as email address will be shown on the Lead Retrieval page. You will also be able to see any notes taken by the scanner.

The Lead Retrieval Dashboard will display all captured leads along with the manager or staff member who scanned them. There are four tables in the dashboard.
Top 5 Lead Owners

The Top 5 Lead Owners table displays the 5 managers or staff members who scanned the most leads. Leads entered by the attendee will not count towards this table. Select View All to display all managers and the number of leads they have captured.
Lead Rating

The Lead Rating table will display all managers and staff members who have scanned a lead. Managers and staff members who have not scanned a lead will not show up in this table. A maximum of 5 managers and staff will be displayed, select View All to display all managers and staff.
Leads Over Time

The Leads Over Time table displays all leads captured throughout the duration of the event as a line graph. Only the days where leads were scanned will be displayed on this table. Selecting any of the ratings at the top of the table will filter the results to leads with that rating.
List of Leads

The List of Leads table covers all leads captured. At the top of the table, there is a search bar to look up specific leads. There are also two filter options to sort by individual ratings and owners. Selecting View All will display all leads and allow managers to export them as a CSV file. Finally, selecting More Details will open up a complete list of information captured by the lead. For more information, please review types of lead retrieval data below.
Using Date Ranges
Date ranges can be used to filter scans by specific dates on the top right corner of the screen.
- From the Exhibitor Portal, navigate to the Lead Retrieval tab
- On the top right corner of the dashboard, select the state date
- Select the end date
- Select the Refresh button

The Lead Retrieval Dashboard will now display updated information based on the parameters you have set.
Downloading Lead Retrieval Results
All submitted leads can be exported from the Exhibitor Portal.
- From the Exhibitor Portal, navigate to the Lead Retrieval tab
- Next to the List of Leads table, select View All

- Above the Lead Retrieval Results table, select Click on Actions > Download CSV
- You may also select Update Rating to manually adjust the rating of the captured lead.

-
Types of Lead Retrieval Data
Below are all the data fields will be able to download from your leads. Any fields that are blank (other than ratings/captured manager) are due to attendee not filling out that particular information.
- Name: The full name of the lead
- Title: The title of the lead
- Organization: The organization of the lead
- Email: The email address of the lead
- Phone: The phone number associated with the lead
- Website: The personal website linked to the lead
- LinkedIn: The LinkedIn profile of the lead
- Twitter: The Twitter profile of the lead
- Address line 1: The first line of address associated to the lead
- Address line 2: The second line of address associated to the lead
- City: The city associated to the lead
- State: The state associated to the lead
- Zip: The zip-code associated with the lead
- Country: The country associated with the lead
- Date Captured: The capture date of the lead’s information
- Captured by Manager: The exhibitor booth’s manager that captured the lead
- Rating Budget: The Rating Budget the exhibitor manager assigned to the lead
- Rating Authority: The Rating Authority the exhibitor manager assigned to the lead
- Rating Need: The Rating Need the exhibitor manager assigned to the lead
- To see exhibitor/lead in menu, one must be added as a Manager or Primary contact under exhibiting company profile.
-
Other Lead Retrieval Package features
Meeting Bookings, Business Card Capture, Custom Questions and API Webhooks are features now included with lead retrieval purchase.
*Find out more on each feature below:
-
Exhibitor Meeting Booking
Attendees will be able to schedule meetings with exhibitor managers. Managers can opt out of this feature from the Exhibitor Portal.
-
- From the Exhibitor Portal, navigate to Meetings> Settings
- Toggle off the Enable meeting booking checkbox to opt out of meeting with Attendees
- Select Save Changes
The Exhibitor Portal will also collect all meeting information which can be downloaded as a CSV file.
-
- From the Exhibitor Portal, navigate to Meetings> Settings
- Select Actions > Download CSV
If it is necessary to delete a meeting from the record, that can be done.
-
- From the Exhibitor Portal, navigate to Meetings> Settings
- Select Actions> Delete
-
-
Business Card Capture
Business Card Capture
Exhibitor managers can scan and save business cards for later use.
To use Business Card Capture.
-
- From the Event App, open the hamburger menu on the top right of the screen
- Under Exhibitor Tools select Business Card Capture
- Select the exhibitor you would like to scan business cards for
- Under Scanner, select Launch Scanner
- Navigate to Business Cards to see already captured business cards
- Once the business card is in view of the camera, select the bottom icon to take a picture
- Optionally, select Retake if the picture is unsatisfactory
- Fill out the Click to add Title and Click to add Notes fields
- Select Submit
Captured Business cards can be retrieved from the Exhibitor Portal.
-
- From the Exhibitor Portal, navigate to Lead Retrieval > Business Cards
- Select Actions> Download CSV
-
-
Custom Lead Retrieval Questions
Create custom form questions from the exhibitor portal just as an event administrator would from the Event Dashboard. These questions are useful for internal tracking purposes and give an additional layer of detail in addition to scanning with Lead Capture. Questions from the custom form will overwrite the default rating system when scanning an attendee in.
-
- From the Exhibitor Portal, navigate to Lead Retrieval > Form
- Fill out the Name field and optionally add a description
- Select Add Input
- Select any of the five inputs for your questions
- Select Create Form
Selecting Delete Form will remove the form from the exhibitor portal and for attendees. At any time, edits can be made to the form and updated when Save Changes is selected.
-
-
-
App Features - Matchmaking (Products & Services)
The Matchmaking feature is a great way for attendees to find exhibitors that have the products and services they are interested in.
-
Adding Products/Services to Exhibitor Profile for Matchmaking
- From Exhibitor Portal navigate to Company Profile
- Scroll down and click on all products/services that your company provides
-
How Attendee's Use Exhibitor Matchmaking
Attendees can start matchmaking as soon as they enter the Exhibitors tab.
- From the Mobile Event App, navigate to Exhibitors > Exhibitors
- A new pop-up will appear, select the interests that apply to you
Once the interests are selected, a new tab will appear called Recommended. This tab will show your matched exhibitor. Please note, exhibitors will only appear if the match is 50% or higher.
If you made a mistake or changed your mind on a particular interest you can update your preferences through the Recommended tab and select Update Interests.
-
How to View Matched Attendees as an Exhibitor
Exhibitors can view matches with attendees once they log into an exhibitor account and they are associated as a manager in the Event Dashboard. If neither one of these conditions are met then they won’t be able to see the matchmaking percentage.
- From the Mobile Event App, navigate to Attendees
- A percentage will appear on the top right corner of an Attendee’s card showing how closely their interests match with your exhibit.
As an exhibitor, you will have the option to sort the attendees by match percentage. Attendees will be sorted from most to least, top to bottom, based on their match percentage.
- From the Attendees tab, navigate to Filters > Filter by Other
- Turn on the Matches toggle
It is recommended that exhibitors reach out to interested attendees. Not only is it a great way to break the ice with attendees, it is also a good way to gauge what products and services are viable.
- From the Mobile Event App, navigate to Attendees
-
-
GRAPHICS PRO EXPO APP Basics
The new GPX App will be the place to scan leads, view sessions, connect with attendees, and more!
*In order to view Exhibitor Leads menu, you must be added as a “Manager” in exhibitor portal.
*For Lead Retrieval Please Note: Ensure you have given the event app permission to access your device’s camera (if you denied permission earlier, enable it via your device’s app settings)
-
Downloading GPX App
Each city available 30 days prior to event
-
Logging Into GPX App wiith an Email
PheedLoop supports one time password logins through email for GPX App. With this feature, users can simply send a code to their email and enter the corresponding code to login.
Please note, this feature is only available to users who have been registered/added as user. It is not possible to use this feature to create new accounts.

- From your mobile device, open GRAPHICS PRO EXPO
- Under the Email field, enter your email address
- If you would like to login with the password instead, select sign in with a password instead
- Select Sign In with Email
- Open your email and copy the verification code sent
- Copy and paste the code into GRAPHICS PRO EXPO
If successful, you will be taken to the Event Selection page where you can open the event you have registered for. We suggest checking your email for your account to ensure you have logged in with the correct email address. If you have logged in but cannot see your event, please reach out to gpxinfo@cahabamedia.com to confirm your email address has been added as a user/attendee.
-
Logging into GPX App with a password
While GPX App supports one time password by default, attendees can still login with their password if preferred.

- From your mobile device, open GRAPHICS PRO EXPO App
- In the login page select sign in with a password instead
- Under the Email field, enter your email address
- Under the Password field, enter your password
- Select Forgot your password if you need to reset your password
- Select Login
If successful, you will be taken to the Event Selection page where you can open the event you have registered for. We suggest checking your email for your account to ensure you have logged in with the correct email address. If you have logged in but cannot see your event, please reach out to gpxinfo@cahabamedia.com to confirm your email address has been added as a user/attendee. -
Resetting Attendee Passwords in GPX App
If you cannot login, ensure the email address and password you have entered are correct. If you are certain you have entered the correct email address, then reset your password:

- From the login page, select the Forgot Password button
- Enter your email address
- Select Submit
An email will now be sent, allowing you to reset your password. If you do not receive an email, contact event services or gpxinfo@cahabamedia.com to confirm your email address is added in their Event.
-
Understanding Event App Pages
Once you have logged into GRAPHICS PRO EXPO App and entered the Event page, you will now be at the starting point for your event experience. All the features mentioned at the beginning of this article will be accessible here, either from the home page or the side menu.
The Home page will contain widgets which you can select to take you to the corresponding page.
Each page can be accessed from opening the Hamburger menu on the top left corner of your screen.

Commonly used pages from Attendees include:
Schedule
The Schedule page will show all publicly available sessions for the Event. Attendees can register for sessions by adding to their schedules.
Speakers
The Speakers page will display all Speakers for your event, including the sessions they will be speaking at.
Exhibitors
The Exhibitors page will display all Exhibitors for your event.
Attendees
The Attendees page will display all Attendees attending the event. If an Attendee has Allow my profile to be publicly visible toggled off then their profile will not be visible in this page.
-
Understanding Settings - Profile
There are multiple settings Attendees can configure for their profiles, including the option to opt out of certain features.
Each page can be accessed from opening the Hamburger menu on the top left corner of your screen. Either click on your profile icon or scroll down the hamburger menu and select Settings.

- From the Event Home Page, select the Hamburger menu
- Select your profile to access your settings
- Alternatively, scroll down to the bottom of the menu and select Settings
You will now be taken to the settings page where you can edit the settings for your account.
Profile
Change Profile Photo – Select the profile icon to upload your own custom icon. Select Snap Photo to use your camera as your profile picture. Select Select Photo to upload a photo from your gallery as your profile picture. Select Remove Photo to restore the profile picture to the default photo.
First Name – The first name of your profile can be edited under this field.
Last Name – The last name of your profile can be edited under this field.
Company – Enter the name of your Company under this field.
Title – Enter your title under this field
Designation – Enter your designation under this field
Location – Enter your location under this field
City – Enter your city under this field
Bio – Enter an introduction about yourself under this field
LinkedIn URL – Add an URL for your LinkedIn profile under this field. If added, a LinkedIn icon will be visible under your attendee profile.
Twitter URL – Add an URL for your Twitter profile under this field. If added, a Twitter icon will be visible under your attendee profile.
Website URL – Add an URL for your personal website under this field. If added, a mouse icon will be visible under your attendee profile.
Allow my profile to be publicly visible – Toggle this setting on to mark your profile as visible. If toggled off, your profile will be hidden in the Attendees page. Please note, your profile will need to be marked as visible in order to use certain features such as messaging and meeting booking.
Allow other attendees to message me – Toggle this setting on to allow attendees to message you.
Allow private messages notifications – Toggle this setting on to allow notifications when an attendee messages you.
Disable announcement notifications – Toggle this setting off to stop notifications from appearing in your device.
-
Understanding Settings - other
Files
The Files tab will contain all the files shared to you by the Event Administrator. Select the file to open it in a browser where you can download it for further use.
App Settings
Current Language – This setting will allow you to change languages if offered by the event. Select the dropdown and select the checkbox next to the language of your choice to switch to that language.
Theme – The Theme field will allow you to switch between light mode and dark mode on the Event App. Select the Light checkbox to use the light theme. Select the Dark checkbox to use the dark theme. Select the System checkbox, to use the theme settings from your mobile device.
Session reminder interval – This field will set an automated reminder before your session start date. Select the dropdown to pick a time for when the reminder is sent to your mobile device. Select None in the dropdown menu to opt out of this feature.
Locations and Time Zones
All times set in the Event App are dependent on the timezone set in the Event Dashboard. This includes sessions, meetings, messages, and all features in the Event App. The timezone for the event can be found on the top right corner of the schedule page.
-


